| Version 24 (modified by , 17 years ago) ( diff ) |
|---|
On this page we offer a guide how to add your own overlay protocol implementation to OverSim.
Other good starting point you could look at:
- The source code of the Chord protocol in src/overlay/chord/Chord.cc
- The OMNeT++ documentation
Be careful:
- This documentation covers only OMNeT++-4.0 compatible versions of OverSim!
(For documentation about OMNeT++-3.x compatible versions of OverSim, see OverSimDevelopOld) - It is still under development and may be partly incorrect or outdated!
--> Any suggestions or contributions are welcome!
1. Implementing new overlay modules in OverSim
This is a guide to implement new overlay modules for OverSim. It is aimed to be an introductory guide, for more in-depth information you should consult the doxygen documentation. We'll explain the architecture using an example overlay module, and its corresponding application module.
This guide is divided as follows. In order to understand the place an overlay module takes inside nodes and how it interacts with them, first the module hierarchy for overlay hosts is described. Then we proceed to explain overlay and application modules with an example overlay. Later, we describe how to make a configuration file to run the overlay, and, as the final chapter, how to compile and run the simulator.
2. OverSim Nodes
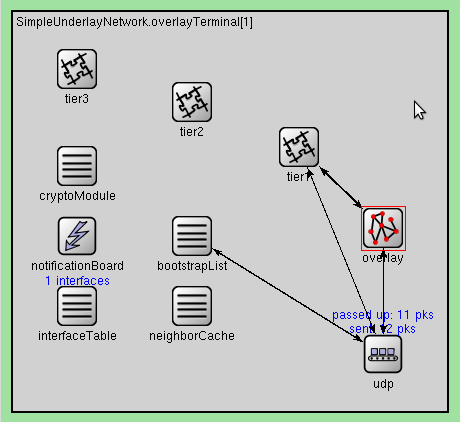
OverSim nodes are the equivalent of individual terminals in the simulation environment. Nodes are based on a multi-tiered module hierarchy similar to OSI network layers (e.g. transport, overlay, application). The most used node type is called SimpleOverlayHost, and its tiers are structured as follows:

The UDP module is an implementation of the transport layer, and is in charge of communication between nodes. Above it is the overlay (KBR) tier, where the overlay module will be located. It communicates with other overlay nodes through the UDP layer, and exposes its services to the application layer above it. On the third tier is the application layer, which uses the services provided by the overlay module. Application modules may also use UDP directly if necessary. Other tiers may be activated above the application if required, these connect to the tier below and to the UDP module.
2.1 Module Declaration
For module declarations, OverSim uses the NED language, a topology description language. Modules should be declared in their own NED files (with extension .ned), and the file name should match the module name (minus the extension!).
First, we start with our overlay module. All overlay module files should be located in OverSim/src/overlay, so we'll create a folder called myoverlay, and inside, we'll create a file called MyOverlay.ned.
Following is the declaration for MyOverlay:
// sets the package, the name must match the path to the module (from src/ upwards)
package oversim.overlay.myoverlay;

// import BaseOverlay
import oversim.common.BaseOverlay;

simple MyOverlay extends BaseOverlay
{
    parameters:
        @class(MyOverlay)
        bool enableDrops;       // do we enable random packet drops for testing?
        double dropChance;      // chance that we drop a packet
}
The parameters subsection is a list of module properties. These parameters must be set before the simulation (or the simulator will stop and ask you for a value each time a module is created!) and will be read-only while the simulation is running. As parameter types we can use booleans (bool), strings, integers, or doubles; custom types (either module declarations or C++ types) can also be used.
Notice that, since we're writing an overlay module, we'll declare our module as inheriting from the parent class BaseOverlay. Therefore we'll use "extends BaseOverlay" in the module definition. Since we want to use our own code for our module, we'll add "@class(MyOverlay)" in the parameters section, to tell the simulator that MyOverlay is a class of its own.
Now, we'll declare our application module in a similar way. Application files should be located in OverSim/src/applications, so we'll create a folder called myapplication (folder names are in lower case by convention) and there a file called MyApplication.ned.
// sets the package, the name must match the path to the module (from src/ upwards)
package oversim.applications.myapplication;

// import BaseApp
import oversim.common.BaseApp;

simple MyApplication extends BaseApp
{
    parameters:
        @class(MyApplication);     // same as in MyOverlay
        int sendPeriod @unit(s);   // how much time to wait between sending packets (in seconds)
        int numToSend;             // how many packets will we send at the same time?
        int largestKey;            // largest key we can pick
}
Numeric parameters, like sendPeriod, can use custom units (in this case, seconds).
2.1.1 Simple and Compound Modules
MyOverlay and MyApplication are examples of what is called a 'simple' module, because they don't contain any other modules inside them. Simple modules are declared using the keyword "simple" (for example, "simple MyOverlay"). Only simple modules can have its behaviour customized with C++ (see Section 4).
On the other hand, modules with inner nested modules are called compound modules, and act only as containers. They are declared with the keyword "module". These are useful when we want to organize all the modules related to your overlay in a single place.
It is encouraged to always use container modules as wrappers, even if they contain only a single module.
An example overlay compound module is as follows:
import oversim.common.IOverlay;

module MyOverlayModules like IOverlay
{
    gates:
        input udpIn;   // gate from the UDP layer
        output udpOut;    // gate to the UDP layer
        input appIn;   // gate from the application
        output appOut;    // gate to the application

    submodules:
        myOverlay: MyOverlay;

    connections allowunconnected:
        udpIn --> myOverlay.udpIn;
        udpOut <-- myOverlay.udpOut;
        appIn --> myOverlay.appIn;
        appOut <-- myOverlay.appOut;
}
As you can see, the inner module "myOverlay" of type MyOverlay is nested inside MyOverlayModules. However, when we use MyOverlayModules, all messages that need to be sent to myOverlay will be sent to the wrapper instead. Therefore, we need to set up which gates we're going to use (input and output to the overlay and the UDP module), and then connect them to the overlay gates. There is no need to change the default entries in the sections "gates" and "connections" for other overlays (but keep the order! gates - submodules - connections).
Notice that we used "like" instead of "extends". This is because IOverlay is simply an interface, not a parent class; we don't want to inherit from it. Additionaly, no "@class" is needed, since compound modules can't be extended with C++ code.
Now we do the same thing for our application module:
import oversim.common.ITier;

module MyApplicationModules like ITier
{
    gates:
        input udpIn;             // gate from the UDP layer
        output udpOut;           // gate to the UDP layer
        input from_lowerTier;    // gate from the lower tier
        input from_upperTier;    // gate from the upper tier
        output to_lowerTier;     // gate to the lower tier
        output to_upperTier;     // gate to the upper tier
        input trace_in;          // gate for trace file commands

    submodules:
        myApplication: MyApplication;

    connections allowunconnected:
        from_lowerTier --> myApplication.from_lowerTier;
        to_lowerTier <-- myApplication.to_lowerTier;
        udpIn --> myApplication.udpIn;
        udpOut <-- myApplication.udpOut;
        trace_in --> myApplication.trace_in;
}
Notice that we now use the ITier interface. Additionaly, the sections "gates" and "connections" look a bit different, but there is still nothing you need to change.
3. Messages
For sending messages, we can use the basic cPacket class (which inherits from the generic cMessage class). However, we'll be needing a few custom fields for our application. Thus, we'll use a customized message instead. Custom message declarations are like those of modules, but without sections: simply include the parameters directly. The framework will automatically create getter- and setter-functions for each of them.
And like modules, messages should be declared in their own (.msg) files.
In this case, let's see MyMessage.msg:
// Import the C++ TransportAddress class

cplusplus {{
#include <TransportAddress.h>
}}
class noncobject TransportAddress;            // noncobject means it's not a message class.

// First, we declare an enum for the message type:
// Enumerations in messages MUST have a value.

enum MessageType {
    MYMSG_PING = 1;           // outgoing message
    MYMSG_PONG = 2;           // returning message
}

// now we declare the message proper

packet MyMessage {
    int type enum (MessageType);     // message type
    TransportAddress senderAddress;  // address of the node that sent the message
}
In order to route packets in a realistic way, the "length" parameter of the message should be set to an appropiate value. This is done manually by using the setBitLength(bits) or setByteLength(bytes) function when sending the message. Forgetting to set this value will default the length to a size of 0, potentially making measurements such as latencies less meaningful.
All messages can encapsulate any other message (just avoid recursivity!) by using the encapsulate() function. To decapsulate the message, use decapsulate(). To peek the encapsulated message without decapsulating it, use getEncapsulatedMsg(). The length of the message is automatically updated.
Additionaly, each message that is created must be deleted exactly once. Messages that aren't deleted will cause memory leaks, and those that are deleted twice can cause a segmentation fault. It is the responsibility of the programmer to know when a message should be deleted.
4. Implementing the overlay and application modules
In this section, we'll implement our overlay and application. But first, let's do a introduction about some of the important variable types used in OverSim.
BaseOverlay: Template overlay module class. All overlay modules should derive from it.
BaseApp: Template application module class. All application modules should derive from it.
OverlayKey: Class to describe overlay keys. Internally it stores the key as an bit array.
Its value can be set in different ways when it's being initialized:
OverlayKey();           // initializes the key as UNSPECIFIED.
                        // While in this value, most of the key operations are invalid!
OverlayKey(5);          // initializes the value as an 32-bit integer.
OverlayKey(buffer, 32); // initializes the value from the first 32 bytes of buffer.
OverlayKey().random();  // initializes the value as a random bit array.
OverlayKey operations include equality (==), order (<, >) and range (isBetween(key1, key2)).
IPvXAddress: Generic IP address, can contain either an IPv4 address (IPAddress) or an IPv6 address (IPv6Address).
TransportAddress: A structure containing bot an IPvXAddress (field "ip"), and a port (field "port").
NodeHandle: A child class of TransportAddress, additionaly contains an OverlayKey (field "key"). In overlay and application modules, the variable "thisNode" contains the NodeHandle value representing the host. However, in application modules the "key" field may not be set.
Now, let's continue with the implementation.
4.1 Implementing the Application
First, we'll start with MyApplication, since the application interface is easier to understand. Our application will implement a simple PING-type program, in which a packet is sent to another node, and that node sends the packet back. When we start, we'll wait <sendPeriod> seconds, then we'll route <numToSend> packets to random keys through the overlay. When a node receives a packet, it will send it back to the owner through UDP. The process is repeated until the simulation ends.
If you use UDP and expect to receive packets, notice that you first must bind a port for your application to use. This can be done with bindToPort(port), and you can bind as many ports as you like. Note however that, when receiving a packet, the port in which the packet came won't be passed up to the application. Don't use port numbers 1024-1034, as they are reserved for overlay use. The overlay module reserves its ports automatically.
This is the declaration of MyApplication from MyApplication.h:
class MyApplication : public BaseApp
{
    // module parameters
    simtime_t sendPeriod;     // we'll store the "sendPeriod" parameter here
    int numToSend;            // we'll store the "numToSend" parameter here
    int largestKey;           // we'll store the "largestKey" parameter here

    // statistics
    int numSent;              //number of packets sent
    int numReceived;          //number of packets received

    // our timer
    cMessage *timerMsg;

    // application routines
    void initializeApp(int stage);                 // called when the module is being created
    void finishApp();                              // called when the module is about to be destroyed
    void handleTimerEvent(cMessage* msg);          // called when we received a timer message
    void deliver(OverlayKey& key, cMessage* msg);  // called when we receive a message from the overlay
    void handleUDPMessage(cMessage* msg);          // called when we receive a UDP message
};
Now comes the implementation of MyApplication from MyApplication.cc:
// This line tells the simulator that MyApplication is going to be extended using C++ code.
// It *must* be present (only once) somewhere in your code, outside a function, for each module you'll be extending.

Define_Module(MyApplication);

// initializeApp is called when the module is being created.
// Use this function instead of the constructor for initializing variables.
void MyApplication::initializeApp(int stage)
{
    // initializeApp will be called twice, each with a different stage.
    // stage can be either MIN_STAGE_APP (this module is being created), or MAX_STAGE_APP (all modules were created).
    // We only care about MIN_STAGE_APP here.

    if (stage != MIN_STAGE_APP) return;

    // copy the module parameter values to our own variables

    sendPeriod = par("sendPeriod");
    numToSend = par("numToSend");
    largestKey = par("largestKey");

    // initialize our statistics variables

    numSent = 0;
    numReceived = 0;

    // tell the GUI to display our variables

    WATCH(numSent);
    WATCH(numReceived);

    // start our timer!

    timerMsg = new cMessage("MyApplication Timer");
    scheduleAt(simTime() + sendPeriod, timerMsg);

    // bind our port to receive UDP packets
    // the value for thisNode.port will be updated accordingly
    bindToPort(2048);
}


// finalize is called when the module is being destroyed

void MyApplication::finishApp()
{
    // first we'll delete our timer

    delete timerMsg;

    // finalize() is usually used to save the module's statistics.
    // We'll use globalStatistics->addStdDev(), which will calculate min, max, mean and deviation values.
    // The first parameter is a name for the value, you can use any name you like (use a name you can find quickly!).
    // In the end, the simulator will mix together all values, from all nodes, with the same name.

    globalStatistics->addStdDev("MyApplication: Sent packets", numSent);
    globalStatistics->addStdDev("MyApplication: Received packets", numReceived);
}


// handleTimerEvent is called when a timer event triggers

void MyApplication::handleTimerEvent(cMessage* msg)
{
    if (msg == timerMsg) {    // is this our timer?
        scheduleAt(simTime() + sendPeriod, timerMsg); // reschedule our message

        // if the simulator is still busy creating the network, let's wait a bit longer
        if (underlayConfigurator->isInInitPhase()) return;

        for (int i = 0; i < numToSend; i++) {
            OverlayKey randomKey(intuniform(1, largestKey)); // let's create a random key

            MyMessage *myMessage;                            // the message we'll send
            myMessage = new MyMessage();
            myMessage->setType(MYMSG_PING);                  // set the message type to PING
            myMessage->setSenderAddress(thisNode);           // set the sender address to our own
            myMessage->setByteLength(100);                   // set the message length to 100 bytes

            numSent++;                                       // update statistics

            callRoute(randomKey, myMessage); // send it to the overlay
        }
    } else {
        delete msg; // unknown packet
    }
}

// deliver is called when we receive a message from the overlay.
// Unhandled or unknown packets can be safely deleted here.

void MyApplication::deliver(OverlayKey& key, cMessage* msg)
{
    // we are only expecting messages of type MyMessage, throw away any other
    MyMessage *myMsg = dynamic_cast<MyMessage*>(msg);
    if (myMsg == 0) {
        delete msg;     // unknown!
        return;
    }

    // are we a PING? send a PONG!
    if (myMsg->getType() == MYMSG_PING) {
       myMsg->setType(MYMSG_PONG);                         // change type
       sendMessageToUDP(myMsg->getSenderAddress(), myMsg); // send it back to its owner
    } else {
       delete msg;     // unhandled!
    }
}

// handleUDPMessage is called when we receive a message from UDP.
// Parameter msg is actually of type cPacket*, set to the more generic cMessage* for legacy purposes.
// Unhandled or unknown packets can be safely deleted here.

void MyApplication::handleUDPMessage(cMessage* msg)
{
    // we are only expecting messages of type MyMessage
    MyMessage *myMsg = dynamic_cast<MyMessage*>(msg);

    if (myMsg && myMsg->getType() == MYMSG_PONG) {
       numReceived++;
    }

    // Whatever msg was, we won't need it anymore.
    delete msg;
}
4.2 Implementing the Overlay
Now, we'll implement our overlay module. Our overlay will be rather simple, and based on only two concepts. First, an overlay key maps directly to the IP address of its holder (for example, key 16 will be held by 1.0.0.16). And second, routing a packet from key A to key B will consist of sending that packet to all nodes with keys between A and B (for example, sending a node from key 4 to key 1 will create a route of 4 - 3 - 2 - 1).
This is the declaration of MyOverlay in MyOverlay.h
class MyOverlay : public BaseOverlay {
  public:
    // Routing parameters
    int myKey;               // our overlay key
    NodeHandle prevNode;     // next node in chain
    NodeHandle nextNode;     // previous node in chain

    //module parameters
    double dropChance;       // we'll store the "dropChance" parameter here

    // statistics
    int numDropped;          // how many packets have we dropped?

    // overlay routines
    void initializeOverlay(int stage);              // called when the overlay is being initialized
    void setOwnNodeID();                            // (optional) called to set the key of this node (random otherwise)
    void joinOverlay();                             // called when the node is ready to join the overlay
    void finalizeOverlay();                         // called when the module is about to be destroyed

    // obligatory: called when we need the next hop to route a packet to the given key
    NodeVector* findNode(const OverlayKey& key,     // key to route to
                         int numRedundantNodes,     // next hop candidates to return if we're not responsible for "key"
                         int numSiblings,           // how many siblings to return if we're responsible for "key"
                         BaseOverlayMessage* msg);  // message being routed

    // obligatory: In general, called when we need to know whether "node" is amongst numSiblings closest nodes to "key".
    // But normally it is called with "node" set to "thisNode", and asking whether we are responsible for "key"
    bool isSiblingFor(const NodeHandle& node,       // which node (usually thisNode) we're referring to
                      const OverlayKey& key,        // key in question
                      int numSiblings,              // how many siblings we're querying about
                      bool* err);                   // set to false when we couldn't determine the range

    // obligatory: Set the maximum number of siblings that can be queried about in isSiblingFor(usually 1)
    int getMaxNumSiblings();

    // obligatory: Set the maximum number of redundant nodes that can be queried about in isSiblingFor (usually 1)
    int getMaxNumRedundantNodes();

};
Now comes the implementation of MyOverlay from MyOverlay.cc:
// Important! This line must be present for each module you extend (see MyApplication)
Define_Module(MyOverlay);

// To convert between IP addresses (which have bit 24 active), and keys (which don't), we'll need to set or remove this bit.
#define BIGBIT (1 << 24)

// Called when the module is being initialized
void MyOverlay::initializeOverlay(int stage)
{
    if (stage != MIN_STAGE_OVERLAY) return;         // see BaseApp.cc

    myKey = thisNode.ip.get4().getInt() & ~BIGBIT;  // get our key from our IP address

    // initialize the rest of variables
    numDropped = 0;
    if (!(par("enableDrops"))) {
        dropChance = 0;
    } else {
        dropChance = par("dropChance");
    }
}

// Called to set our own overlay key (optional)
void MyOverlay::setOwnNodeID()
{
    thisNode.key = OverlayKey(myKey);   // create the corresponding overlay key
}

// Called when the module is ready to join the overlay
void MyOverlay::joinOverlay()
{
    // Set the information of the previous step in the chain
    prevNode.ip = IPAddress(BIGBIT | (myKey - 1));
    prevNode.port = thisNode.port;
    prevNode.key = OverlayKey(myKey - 1);

    // Set the information of the next step in the chain
    nextNode.ip = IPAddress(BIGBIT | (myKey + 1));
    nextNode.port = thisNode.port;
    nextNode.key = OverlayKey(myKey + 1);

    // tell the simulator that we're ready
    setOverlayReady(true);
}

// Return whether we know if the given node is responsible for the key
bool MyOverlay::isSiblingFor(const NodeHandle& node,
                             const OverlayKey& key,
                             int numSiblings,
                             bool* err)
{
    if (node == thisNode && key == thisNode.key) { // is it our node and our key?
        return true;
    }
    return false;  // we don't know otherwise
}

// Return the next step for the routing of the given message
NodeVector *MyOverlay::findNode(const OverlayKey& key,
                                int numRedundantNodes,
                                int numSiblings,
                                BaseOverlayMessage* msg)
{
    NodeVector* nextHops;

    if (uniform(0, 1) < dropChance) {          // do we drop the packet?
        nextHops = new NodeVector(0);          // if yes, return an empty node vector
        numDropped++;                          // (don't delete msg here! the overlay will delete it later)
        return nextHops;
    }

    // numRedundantNodes and numSiblings are both maximal 1
    nextHops = new NodeVector(1);

    if (key == thisNode.key) {                 // are we responsible? next step is this node
        nextHops->add(thisNode);
    } else if (key < thisNode.key) {           // is the key behind us? next step is the previous node
        nextHops->add(prevNode);
    } else {                                   // otherwise, the next step is the next node
        nextHops->add(nextNode);
    }
    return nextHops;
}

// Called when the module is about to be destroyed
void MyOverlay::finalizeOverlay()
{
    // remove this node from the overlay
    setOverlayReady(false);

    // save the statistics (see MyApplication)
    globalStatistics->addStdDev("MyOverlay: Dropped packets", numDropped);
}

// Return the max amount of siblings that can be queried about
int MyOverlay::getMaxNumSiblings()
{
    return 1;
}

// Return the max amount of redundant that can be queried about
int MyOverlay::getMaxNumRedundantNodes()
{
    return 1;
}
5. Configuring the Simulation
Now that the overlay module is implemented, we still need to set up a network in order to run that overlay. To do that, we need to edit the omnetpp.ini file, or set up a custom configuration file. The configuration file should be located in the OverSim/simulation folder.
5.1 Setting Parameters
The user can set custom values for module parameters in the file omnetpp.ini (or whichever configuration file you use), or in default.ini for general default values, located in the OverSim/simulation folder. Parameters are hierarchic, separated by a dot for each layer. For example, setting a parameter for a specific overlay module in a node can be done as follows:
SimpleUnderlayNetwork.overlayTerminal[5].overlay.myOverlay.enableDrops = true
In this example, we are working with the network "SimpleUnderlayNetwork". From there, we retrieve the overlayTerminal array, get index 5, and then its overlay module. For that module, we'll use the submodule myOverlay, and set the parameter enableDrops to true.
This case, however, is too specific. We may not always work with the SimpleUnderlayNetwork. Or we may need that parameter to be set for all nodes. For those cases the wildcards * and are of use. For example:
*.overlayTerminal[5].overlay.myOverlay.enableDrops = true
**.overlay.myOverlay.enableDrops = true
- replaces exactly one step of the hierarchy (or a part of a name), while replaces any number of steps. In the first case, * means that the parameter is set for any network (first step). In the second case, means the parameter is set for any network, and any node in it (first and second steps, and further). Wildcards should be used sparingly, since it makes complicated for other users to calculate the scope, and may end up causing unexpected results (including rewriting other parameters).
Should a module parameter not be set in either configuration file, or match any wildcard, OverSim will prompt the user to enter a value for each instance of the module. For simulations with a big amount of nodes, setting each parameter individually quickly becomes overwhelming. Therefore, it is recommended that every module parameter be assigned a default value in default.ini.
Notice that these are parameter paths, not to be confused with module paths from NED declarations (see Section 2.1). In this case, the parameter paths describe a set of modules and submodules to follow to reach the inner parameter we want. On the other hand, the module paths describe the folder under OverSim/src/ in which the declaration of the NED module will be found.
5.2 Creating our Configuration File
Let's create a configuration file in OverSim/simulations called mysim.ini.
The default.ini file contains the default values for many overlay parameters, and therefore it's highly useful to include it in our file. Since the simulator will use the first value it sees, the default value should go at the end.
Therefore, the last line of omnetpp.ini should look like this:
include ./default.ini
Each set of parameters for a simulation environment is called a configuration. A simulation file can contain any amounts of configurations, each with a different name. In the same way, each configuration can contain any amount of overlay parameters as needed.
Since many configurations might specify the same value for a given parameter, we can set a default value in the General section. For example, let's set the value of the base network as SimpleUnderlayNetwork.
[General]
// set all simulations to last 1000 seconds
sim-time-limit = 1000s

// this is a module path! do not confuse with parameter paths.
network = "oversim.underlay.simpleunderlay.SimpleUnderlayNetwork"
Now, unless specified otherwise, all configurations will use SimpleUnderlayNetwork as their network. Notice that the value of "network" is a module path, which represents the location of the ned file, and not a parameter path.
Further on networks, there are two base networks: SimpleUnderlay and Ipv4Underlay. SimpleUnderlay is a simplified flat network where each node is assigned coordinates, packet latencies are calculated based on the distance of the source and destination node coordinates, and each nodes are directly connected to one another. Ipv4Underlay emulates real-life networks and contain hierarchies of nodes, routers, and backbones. Network modules can be accessed under the names of SimpleUnderlayNetwork for SimpleUnderlay and Ipv4Network for Ipv4Underlay.
Now, once the network type has been set, we can set the parameter values that we'll need. For example, let's create a configuration called "Example". There are two basic parts that should be configured: the churn type, and the node parameters.
The churn type tells OverSim how often it should add or delete nodes from the network. There are many churn types (e.g. NoChurn for a static network, LifetimeChurn for creating nodes with a given lifetime distribution, and so on); for a complete list see the ned files in OverSim/src/common. In our example, we'll use the less interesting NoChurn, which disables churn in our network. There are plenty of examples in OverSim/simulations/omnetpp.ini for all churns.
The second part are the node parameters. Two node parameters are obligatory: tier1Type (to specify the application module), and overlayType (for the overlay module). Further parameters can be specified for these application and overlay modules. For this example, we'll use the module MyOverlayModules, which we declared in a previous chapter.
[Config ExampleConf]
description = MyOverlay test (SimpleUnderlayNetwork)

// Configure the churn
*.underlayConfigurator.churnGeneratorTypes = "oversim.common.NoChurn"
**.targetOverlayTerminalNum = 10

// Node parameters
**.overlayType = "oversim.overlay.myoverlay.MyOverlayModules"
**.tier1Type = "oversim.applications.myapplication.MyApplicationModules"

**.myOverlay.enableDrops = true
**.myOverlay.dropChance = 0

**.myApplication.sendPeriod = 1s
**.myApplication.numToSend = 1
**.myApplication.largestKey = 10
Like modules, configurations can also use inheritance. A configuration that inherits from a parent configuration receives all the parameters that were set there, but can change them if needed. For example, let's make two configurations that inherit from ExampleConf:
[Config ExampleA]
extends = ExampleConf
**.myOverlay.dropChance = 0.1
**.myApplication.sendPeriod = 1s

[Config ExampleB]
extends = ExampleConf
**.myOverlay.dropChance = 0.5
**.myApplication.sendPeriod = 2s
Now, we see that both configurations are equal except for their different values for dropChance and sendPeriod. What happens if we need more simulations that have different values for both parameters, but retain the rest? For that, we can use runs.
Let's, for example, create a configuration from ExampleConf, but where dropChance takes the values of 0.1, 0.3, 0.5, and 0.7.
[Config ExampleC]
extends = Example
**.myOverlay.dropChance = ${Drop=0.1, 0.3, 0.5, 0.7}
**.myApplication.sendPeriod = 1s
Here, we have a single configuration, ExampleC, with 4 runs: one for when dropChance is 0.1, the second for when dropChance is 0.3, and so on. In order to identify which dropChance we'll be using for a given run, we'll define a variable called Drop, which will contain the dropChance value. This is specified by the "Drop=" chain inside the dropChance definition. This variable can be used for other purposes, specified in the User Manual.
The results from each run will be saved in a different file (ExampleC-0.sca, ExampleC-1.sca, and so on for the scalar data). The parameter value that was taken for each file is saved within it (together with the variable), to avoid confusion.
Additionaly, many parameters can have variable values, for example, we can set sendPeriod as follows:
...
**.application.sendPeriod = ${Period=1s, 2s, 5s}
In this case, we'll have 12 runs, once for each combination of dropChance and sendPeriod. Furthermore, each run can be repeated as many times as desired.
repeat = 3
With this, we'll have each of the 12 runs repeated 3 times, for a total of 36 runs. It is recommended to simplify your configurations into a single one by using runs, when possible.
6. Compiling and Running
Unlike previous versions of OverSim, now the framework will automatically find any new "cpp" and "ned" files and compile them.
Now we need to build OverSim. There are two types of builds: debug (no optimizations, include debug information) and release (optimizations, with reduced debug information). Go to the root folder and type one of the following:
make MODE=release   # release mode
make MODE=debug     # debug mode
make                # also sets debug mode
That should compile your new modules. To clear all compiled files, use make clean as usual.
In order to run it, you need to setup your configuration in omnetpp.ini as explained in Section 4. Make sure that you selected default values for all parameters in default.ini, or you'll be prompted for a value when the simulation begins (for each module that uses that parameter!).
There are two ways to start OverSim: by using the GUI (Tkenv) or through the command line (Cmdenv). To run OverSim, enter the directory OverSim/simulations and run :
../src/OverSim [-u Tkenv | CmdEnv] [-f customConfigFile] -c configName [-r runNumber]
The configuration is optional if the GUI is enabled, but you'll be prompted later for which configuration to run. If you don't specify a configuration for the command line (or a non-existing one), the simulator will fail silently and run a default simulation.
7. Remote Procedure Calls
Remote Procedure Calls (RPCs) are a useful paradigm for when an application wants to execute a function, but where the context and / or the code are in another host, yet in a transparent way. Continuing our MyOverlay example, let's create an RPC function that retrieves the neighbors from another node.
The MyOverlay header would look this way:
class MyOverlay : public BaseOverlay {
    ...
    // The function that will be called from outside

    void getNeighbors(const OverlayKey& neighborKey);               // asynchronously request the neighbors of neighborKey

    // Callback functions (that will be overwritten)

    virtual void callbackNeighbors(const NodeHandle& neighborKey,
                                   const NodeHandle& prevNeighbor,
                                   const NodeHandle& nextNeighbor); // function to call to respond about the queried neighbors
    virtual void callbackTimeout(const OverlayKey &neighborKey);    // function to call if the query times out

    // Internal handling of RPCs

    bool handleRpcCall(BaseCallMessage *msg);                       // called when we receive an RPC from another node
    void handleRpcResponse(BaseResponseMessage* msg,                // called when we receive an RPC response from another node
                           cPolymorphic* context,
                           int rpcId,
                           simtime_t rtt);
    void handleRpcTimeout(BaseCallMessage* msg,                     // called when an RPC times out
                          const TransportAddress& dest,
                          cPolymorphic* context, int rpcId,
                          const OverlayKey&);


};
The RPC function will query another node about its neighbors. To communicate with that node, we'll need a couple of custom messages.
The first message is the Call message, and inherits from BaseCallMessage. The address of the calling node is stored in BaseCallMessage, so it is not necessary to add it. However, we'll store the destination key, so we can identify the message quickly in case it times out. Note that the name of Call messages should end in "Call". The second message is the Response message, and inherits from BaseResponseMessage. It will contain the key of the responding node, together with both of its neighbors. Note that the name of Response messages should end in "Response".
Here's how they look:
cplusplus {{
#include <NodeHandle.h>
#include <OverlayKey.h>
#include <CommonMessages_m.h>
}}
class noncobject NodeHandle;
class noncobject OverlayKey;
class BaseCallMessage;
class BaseResponseMessage;


packet MyNeighborCall extends BaseCallMessage
{
    OverlayKey destinationKey;
};

packet MyNeighborResponse extends BaseResponseMessage
{
    NodeHandle respondingNode;
    NodeHandle prevNeighbor;
    NodeHandle nextNeighbor;
};
First, we start with the getNeighbors() function, which creates the RPC message.
void MyOverlay::getNeighbors(const OverlayKey &neighborKey)
{
    MyNeighborCall *msg = new MyNeighborCall();
    msg->setDestinationKey(neighborKey);

    // The function we'll be using to send an RPC is sendRouteRpcCall.
    // The first value is to which tier we'll be talking. Can be either OVERLAY_COMP, TIER1_COMP, TIER2_COMP, and so on.
    // The second parameter is the node to which we'll send the message. Can be either an OverlayKey or a TransportAddress.
    // The third parameter is the message.
    sendRouteRpcCall(OVERLAY_COMP, neighborKey, msg);
}
Now, let's see how the RPC calls are implemented:
// Handle an incoming Call message
// Only delete msg if the RPC is handled here, and you won't respond using sendRpcResponse!

bool MyOverlay::handleRpcCall(BaseCallMessage *msg) {

    // There are many macros to simplify the handling of RPCs. The full list is in <OverSim>/src/common/RpcMacros.h.

    // start a switch
    RPC_SWITCH_START(msg);

    // enters the following block if the message is of type MyNeighborCall (note the shortened parameter!)
    RPC_ON_CALL(MyNeighbor) {
        MyNeighborCall *mrpc = (MyNeighborCall*)msg;          // get Call message
        MyNeighborResponse *rrpc = new MyNeighborResponse();  // create response
        rrpc->setRespondingNode(thisNode);
        rrpc->setPrevNeighbor(prevNode);
        rrpc->setNextNeighbor(nextNode);

        // now send the response. sendRpcResponse can automatically tell where to send it to.
        // note that sendRpcResponse will delete mrpc (aka msg)!
        sendRpcResponse(mrpc, rrpc);

        RPC_HANDLED = true;  // set to true, since we did handle this RPC (default is false)
    }

    // end the switch
    RPC_SWITCH_END();

    // return whether we handled the message or not.
    // don't delete unhandled messages!
    return RPC_HANDLED;
}

// Called when an RPC we sent has timed out.
// Don't delete msg here!
void MyOverlay::handleRpcTimeout(BaseCallMessage* msg,
                                 const TransportAddress& dest,
                                 cPolymorphic* context, int rpcId,
                                 const OverlayKey&)
{
    // Same macros as in handleRpc

    // start a switch
    RPC_SWITCH_START(msg);
        // enters the following block if the message is of type MyNeighborCall (note the shortened parameter!)
        RPC_ON_CALL(MyNeighbor) {
            MyNeighborCall *mrpc = (MyNeighborCall*)msg;          // get Call message
            callbackTimeout(mrpc->getDestinationKey());           // call our interface function
        }
    // end the switch
    RPC_SWITCH_END();
}

    // Called when we receive an RPC response from another node.
    // Don't delete msg here!

void MyOverlay::handleRpcResponse(BaseResponseMessage* msg,
                                  cPolymorphic* context,
                                  int rpcId,
                                  simtime_t rtt)
{
    // The macros are here similar. Just use RPC_ON_RESPONSE instead of RPC_ON_CALL.

    // start a switch
    RPC_SWITCH_START(msg);
        // enters the following block if the message is of type MyNeighborResponse (note the shortened parameter!)
        RPC_ON_RESPONSE(MyNeighbor) {
            MyNeighborResponse *mrpc = (MyNeighborResponse*)msg;          // get Response message
            callbackNeighbors(mrpc->getRespondingNode(),
                              mrpc->getPrevNeighbor(),
                              mrpc->getNextNeighbor());                   // call our interface function
        }
    // end the switch
    RPC_SWITCH_END();
}
Have fun!
Attachments (1)
- SimpleOverlayHost.png (22.9 KB ) - added by 17 years ago.
Download all attachments as: .zip